
The ReferenceRun contains specifications for all input, process and output files that are required to run the model. Each FileSpecification contains specifications for the the variables that may be manipulated by ExpertDesigns. The ReferenceRun also contains specifications for the Processes that must be run in order to obtain a solution for the model. The ReferenceRun dialog is displayed when you right-click the ReferenceRun Node and select Change from the menu.
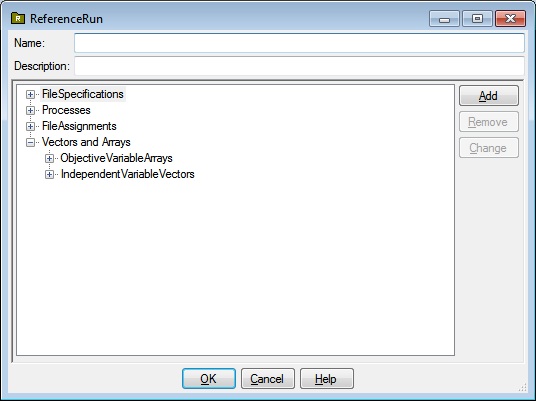
The ReferenceRun dialog has textboxes for entering the Name and Description of the ReferenceRun, a tree with FileSpecifications, Processes, FileAssignments, Vectors and Arrays, ObjectiveVariableArrays, and IndependentVariableVectors nodes and buttons that allow you to Add, Remove and Change subnodes of these nodes, as well as OK, Cancel and Help buttons.
This is the name associated with this ReferenceRun. Once saved to the Knowlegebase, this is the name that will appear under the ReferenceRuns node in the Knowledgebase Explorer application.
This is an optional description associated with the ReferenceRun.
Each FileSpecification Node that appears under the FileSpecifications node displays the FileSpecification name.
To add a FileSpecification node, click the FileSpecifications node if it is not highlighted, then click the Add button. The FileSpecification dialog is displayed.
To remove a FileSpecification node, click the FileSpecification node you wish to remove, then click the Remove button.
To change a FileSpecification node, click the FileSpecification node you wish to change, then click the Change button. The FileSpecification dialog is displayed.
Each Process Node that appears under the Processes node displays the Process name.
To add a Process node, click the Processes node if it is not highlighted, then click the Add button. The Process dialog is displayed.
To remove a Process node, click the Process node you wish to remove, then click the Remove button.
To change a Process node, click the Process node you wish to change, then click the Change button. The Process dialog is displayed.
Each FileAssignment Node that appears under the FileAssignments node displays the FileAssignment name.
To add a FileAssignment node, click the FileAssignments node if it is not highlighted, then click the Add button. The FileAssignment dialog is displayed.
To remove a FileAssignment node, click the FileAssignment node you wish to remove, then click the Remove button.
To change a FileAssignment node, click the FileAssignment node you wish to change, then click the Change button. The FileAssignment dialog is displayed.
Each ObjectiveVariableArray Node that appears under the ObjectiveVariableArrays node displays the ObjectiveVariableArray name.
To add a ObjectiveVariableArray node, click the ObjectiveVariableArrays node if it is not highlighted, then click the Add button. The ObjectiveVariableArray dialog is displayed.
To remove a ObjectiveVariableArray node, click the ObjectiveVariableArray node you wish to remove, then click the Remove button.
To change a ObjectiveVariableArray node, click the ObjectiveVariableArray node you wish to change, then click the Change button. The ObjectiveVariableArray dialog is displayed.
Each IndependentVariable Vector Node that appears under the IndependentVariableVectors node displays the IndependentVariableVector name.
To add an IndependentVariableVector node, click the IndependentVariableVectors node if it is not highlighted, then click the Add button. The IndependentVariableVector dialog is displayed.
To remove a IndependentVariableVector node, click the IndependentVariableVector node you wish to remove, then click the Remove button.
To change an IndependentVariableVector node, click the IndependentVariableVector node you wish to change, then click the Change button. The IndependentVariableVector dialog is displayed.
Clicking OK will validate the information you entered. If valid, the ReferenceRun dialog will be dismissed and the calling dialog or window will be updated with the information you entered. If invalid, you will be presented with an error dialog and the ReferenceRun dialog will remain.
Clicking Cancel will dismiss the ReferenceRun dialog and the calling dialog or window will not be altered.
Help will display this information.